Experimenting with scrolling isometric
17 July 2021
- Tiled and pixel art
- A script for importing
- Rendering
- Game loop
- User input and current position
- What’s next?
I’ve been playing around with different perspectives in games as I learn more, primarily top down, side scrolling, and isometric. Isometric naturally had the steepest learning curve, so I spent some time playing around with prototypes.
Isometric rendering is a technique used to create a 3D-ish looking games but in a 2D space (often called 2.5D). Where a traditional top down or side scrolling game would render in a tile grid where each tile is clearly a square or rectangle, isometric makes the tile appear as if the user is looking down at the map from 30 degrees up. This is acheived by shifting the dimensions of each tile so that they are twice as wide as they are tall.
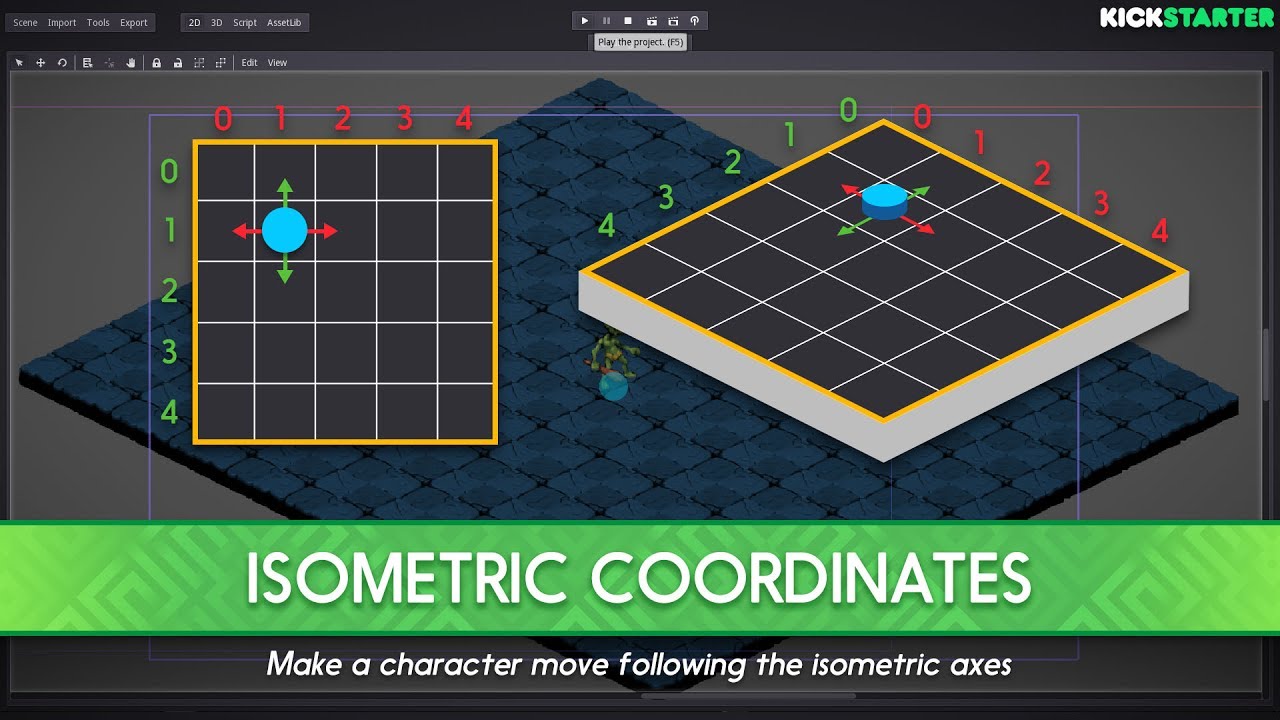
Image used from this GDQuest video.
Tiled and pixel art
Being a programmer without any serious design experience, pixel art was really attractive. I get that pixel art is not neccessarily easier to do very well, but I think the bar to entry is just lower. I ended up using Aseprite to make a couple of isometric tiles and then Tiled to build out a basic map.
Tiled exports the map definition to what they call tsx and tmx files, which at the end of the day are XML files defining the tileset, layers, and layouts of each layer.
A script for importing
I ran across PyTMX and I think I would use it in the future for projects, but decided to parse the Tiled exports myself for the sake of learning a bit more.
I started developing a little sample at https://github.com/holdenrehg-samples/sample_pygame_tiles first with an importer. I was able to depend on the builtin xml.etree module to parse out the sample files into a TileMap object which I defined.
def from_tiled(map_file, base_dir: str):
    map_tree = ElementTree.fromstring(map_file.read())
    tile_set = _parse_tileset(map_tree, base_dir)

    return TileMap(
        size=(
            map_tree.attrib["width"],
            map_tree.attrib["height"]
        ),
        tile_size=(
            map_tree.attrib["tilewidth"],
            map_tree.attrib["tileheight"]
        ),
        layers=_parse_layers(tile_set, map_tree),
        tile_set=tile_set,
    )
Rendering
After loading the tilemap data into a data structure that I could easily work with I created a World class and a Camera class. The idea was to initialize an entire world, but then have the Camera which only renders a slice of that world. Especially when dealing with pygame it’s easy to get into trouble with performance.
The World takes in the TileMap and then renders the game onto a pygame.Surface object given a certain Camera.
class World:
    def __init__(tile_map: pygrid_tiles.TileMap): ...
    def render(screen: pygame.Surface, camera: pygrid_tiles.Camera): ...
The World acts as the glue between TileMap and Camera.
def render(
	self,
	screen: pygame.Surface,
	camera: Camera
):
    for layer_level, layer in enumerate(self.map.layers.values()):
        for coordinates, tile_id in layer.items():
            if int(tile_id):
                # pixel specific x, y
                x = coordinates[0] * self.map.tile_size[0]
                y = (coordinates[1] * self.map.tile_size[1]) + (layer_level * self.map.tile_size[1])

                # tranformed x, y to account for isometric shape
                x = (x - y) / 2
                y = (x + y) / 4

                if camera.in_focus((x, y)):
                    screen.blit(
                        self.map.tile_set[int(tile_id)],
                        (
                            x - camera.position[0],
                            y - camera.position[1],
                        ),
                    )
There are 3 transformation that are happening here. The rest of the code is just iterating through the data provided by Tiled and bliting to the screen.
-
Find pixel specific coordinates. The Tiled data references “tiles” instead of pixels. The x and y coordinates are converted to pixel coordinates by multiplying by the tile sizes.
-
Account for isometric shape. Each tile looks like a diamond on top, with the width 2x the size of the height. So imagine rendering those on a grid where you’ll see gaps in the corners of each piece and it will not give that 3d appearance. So we essentially rotate the entire map 90 degrees, flipping where the x/y axes lie by shifting each individual tile so that they overlap each other (down 25% and over 50%) to form a cohesive map.

-
Handle the camera. And finally we gotta adjust for the camera position.
Game loop
Time to tie it all together into a game loop. I’m going to initialize all of the components. This means the pygame lib, screen/display, camera, and tilemap.
import pygame
import pygame.display
import pygame.event
import pygame.font
import pygame.image
import pygame.key
from pygrid_tiles import imports
from pygrid_tiles.camera import Camera
from pygrid_tiles.world import World

ASSETS_PATH = "pygrid_tiles/demo"
TILESET_PATH = f"{ASSETS_PATH}/ocean-tileset.tsx"
TILEMAP_PATH = f"{ASSETS_PATH}/ocean.tmx"


def main():
    pygame.init()
    pygame.display.init()

    screen_w, screen_h = 1280, 960
    screen = pygame.display.set_mode((screen_w, screen_h))
    camera = Camera([0, 0], [screen_w, screen_h])
    camera_momentum = 6

    # Generate the game world...
    # --------------------------

    world = None
    with open(TILEMAP_PATH) as map_file:
        world = World(imports.from_tiled(map_file, base_dir=ASSETS_PATH))

    # Run the game...
    # ---------------

    running = True

    try:
    	while running:
            screen.fill((0, 0, 0))

            for event in pygame.event.get():
                if event.type == pygame.QUIT:
                    running = False

            world.render(screen, camera)

            pygame.display.flip()
    except pygame.error:
        pass
    finally:
        pygame.quit()
        raise SystemExit

main()
For the sake of simplicity, I just created a main.py file in a demo folder so that I can run python pygrid_tiles/demo/main.py. That’s why I created a def main function and immediatley execute it at the end.
The first step in main is to initialize the pygame lib:
pygame.init()
pygame.display.init()
Then I’m creating the display and camera. This is not the ideal way to handle the display because the size is completley fixed. This means not adapting to different resolutions or screen resizing for example. But it’s the simplest option for a quick prototype.
screen_w, screen_h = 1280, 960
screen = pygame.display.set_mode((screen_w, screen_h))
camera = Camera([0, 0], [screen_w, screen_h])
camera_momentum = 6
Next up is loading in the tile map. That’s where the imports helper comes in:
world = None
with open(TILEMAP_PATH) as map_file:
    world = World(
        imports.from_tiled(
            map_file,
            base_dir=ASSETS_PATH
        )
    )
Finally, starting up the good ol’ game loop:
running = True

try:
    while running:
        # Set the background to black...
        screen.fill((0, 0, 0))

        # Look for events fired from pygame...
        for event in pygame.event.get():
            if event.type == pygame.QUIT:
                running = False

        # Print the tilemap to the screen...
        world.render(screen, camera)

        # Tell the display to update...
        pygame.display.flip()

except pygame.error:
    pass

finally:
    pygame.quit()
    raise SystemExit
User input and current position
Once the world was rendering the way I wanted, the last step was to get the camera to move adjust what’s displaying on screen. Hooking into the arrow keys was the simplest route. For example, when you press the right arrow key, the camera position should increment the x coordinate. Left arrow decrements x, up arrow decrements y, down arrow increments y.
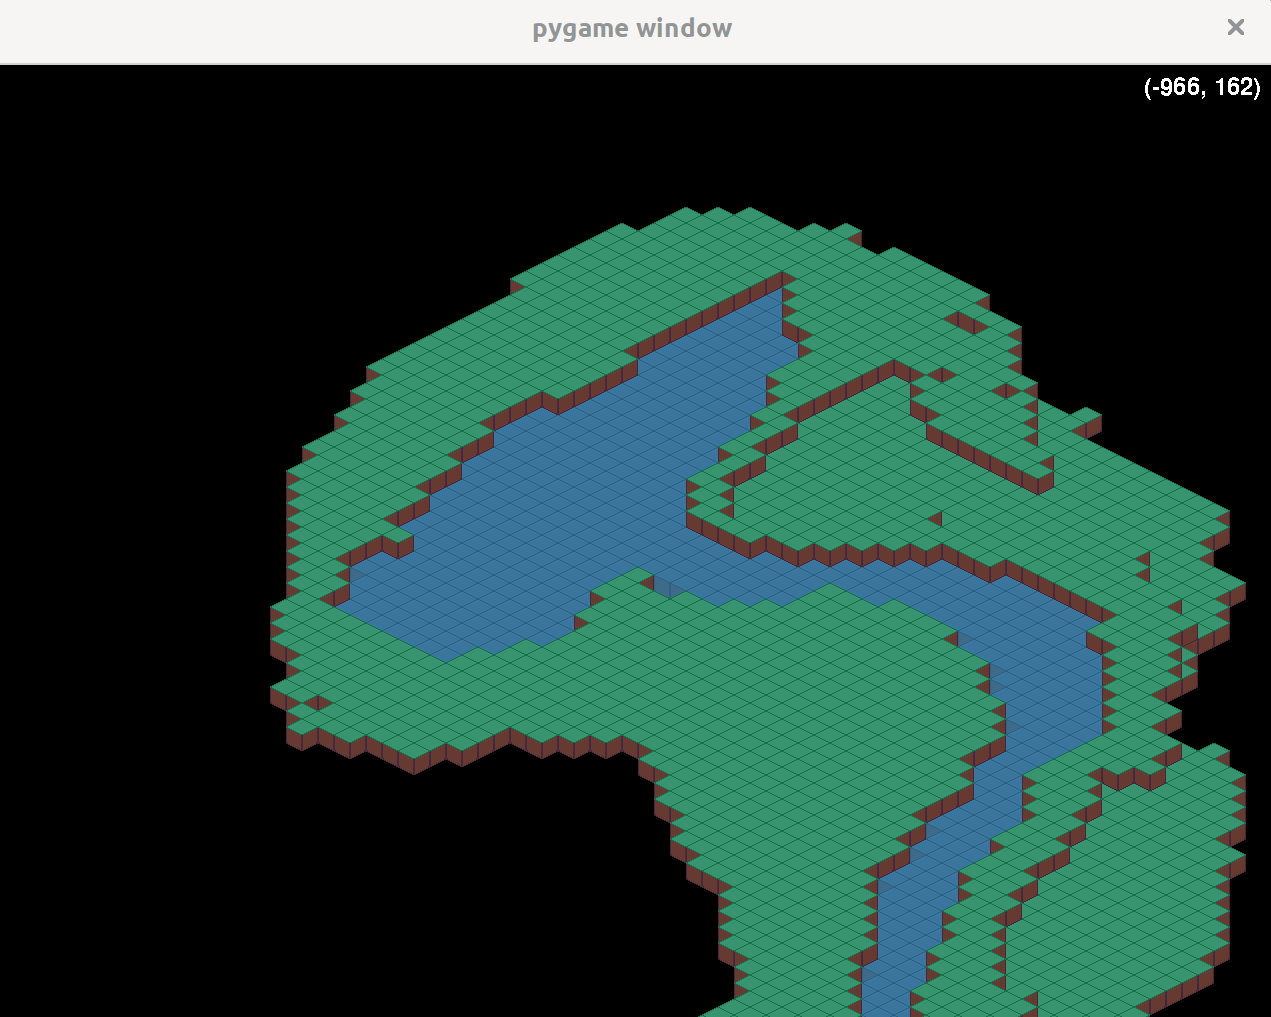
To easily see what’s going on I also wanted to see the current position in the top right corner:
running = True

try:
   while running:
    	...

    	world.render(screen, camera)

    	# Display current camera coordinates...
    	font = pygame.font.SysFont(None, 36)
        text = font.render(
            f"({camera.position[0]}, {camera.position[1]})",
            False,
            (255, 255, 255)
        )
        screen.blit(
            text,
            (camera.size[0] - text.get_rect().width - 10, 10)
    	)

    	...
This involved creating a font variable, generating text with that font via font.render, and bliting that to the top of the screen (x=camera size - width of the text - 10px buffer, y=10px buffer).
Then handling the user input is fairly straight forward. We have all of our data stored and the map automatically handling changes to that tilemap and position data. So to move the camera, we just change the position attribute on our camera object.
try:
    while running:
        ...

        # Handle user input...
        pressed_keys = pygame.key.get_pressed()
        if pressed_keys[pygame.K_LEFT]:
            camera.position[0] = camera.position[0] - camera_momentum
        if pressed_keys[pygame.K_UP]:
            camera.position[1] = camera.position[1] - camera_momentum
        if pressed_keys[pygame.K_RIGHT]:
            camera.position[0] = camera.position[0] + camera_momentum
        if pressed_keys[pygame.K_DOWN]:
            camera.position[1] = camera.position[1] + camera_momentum

        world.render(screen, camera)

        ...
The camera_momentum is initially set to 6 so it will move 6px every frame as you hold down any of the arrow keys.
What’s next?
Building out this little prototype gave me a better idea about how to handle isometric rendering in games in general. I could see moving on to rendering sprites onto the screen, converting between isometric and cartesian coordinates, handling player movement, rendering additional layers of items on top of the world (items, enemies, landscape), etc.
I’m not sure if isometric makes sense for the types of games and prototypes I’m trying to build at the moment, but another tool in the toolbelt.